|
|
LYME REGIS SAILING CLUBNOTES FOR OOD |

1.
Responsibility
Whilst the decision to go to sea firmly rests with the competitor, the decision to postpone, start, finish or abandon the race rests with you as the OOD. The following considerations should be taken into account:- No. of rescue craft, sea & tidal conditions for launch/recovery, wind strength and direction, visibility, weather forecast (increasing wind & threat of lightening), no. of competitors, number & types of craft taking part, competence of competitors. As a guide it is suggested that you don’t organise a race in less than 4 knots or more than 30 knots of breeze.
2.
Preparation
7 days to go (i.e. On the Sunday before your
duty if you are down at Lyme)
1. Look at tide info to establish whether you can get PJ off the mooring and back on again at the end of the day.
2. Find out who to contact to get access to the club and obtain keys to PJ early on Sunday if you intend to use PJ.
3. Find out who is doing PJ & rescue boat duty with you – contact them if possible to ensure that they know about the duty and that they will be down in time.
7- 2 days to go
4. Have a look at RRS and LRSC SI’s to refresh your memory of starting signals etc.
5. Look at the programme to establish what race(s) are programmed together with start times. Think about how this might effect the type of course & management of race (average lap, No. of starts, 2 races back to back, etc).
6. Make a list of the equipment/flags you will need to take to sea
7. Think through what needs to be done when you arrive down at Lyme on the Sunday morning in order to identify what time you need to arrive:
1 day to go
8. Get weather forecast as this might effect what clothing/equipment you bring and safety boats you use.
9. Think again about the course type you are going to use now you have a clear idea of the boats (RIBs/PJ) you are going to use, weather forecast, tidal state and the programme of races.
On the day of the duty
10. Arrive about 1½hrs before the race starts in order to get everything ready
11. Get PJ off the moorings (if required)
12. Assemble the required number of marks and put them in rescue RIB or PJ.
13. Assemble the flags, clock, wind indicator, compass, OOD notes/course angle sheet.
14. Mark up details of the days racing on the sailing notice board in the Club compound: Weather forecast (from the harbour master), racing programme, Start time, course to be sailed, amendments to LRSC SI’s.
15. Carry out radio check & get out to sea to lay the course early (ideally 30mins before start time) as it’s a lot easier laying the course and start line when you have time on your side!
3.
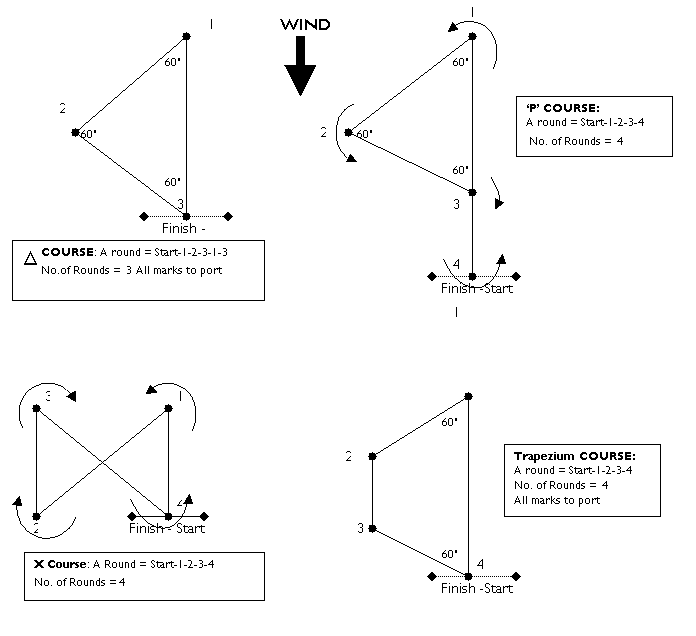
Course
Suggestions

4.
Setting
The Course
![]() a.
Proceed to the middle of the course area. Stop the boat and take a wind bearing
over a 2-3 minute spell to get an average wind direction. NOTE: it is important
to stop the boat – otherwise this will effect your wind reading.
a.
Proceed to the middle of the course area. Stop the boat and take a wind bearing
over a 2-3 minute spell to get an average wind direction. NOTE: it is important
to stop the boat – otherwise this will effect your wind reading.
b. Proceed to where the leeward mark (mark 3 for and P courses & mark 4 for trapezium) and drop.
c. Check the wind direction again to confirm the wind bearing. Once you are happy with the average wind direction, proceed upwind (on the average wind bearing). It’s difficult to explain how long the leg needs to be (ideally, it should take an albacore/laser about 8-10 mins to sail it). You will have to judge this yourself – good luck!
d. When you get to the position that you think the windward mark should be in, stop and check the wind direction. The wind indicator/ticker tape/burgee should be pointing straight down the course at the leeward mark that you originally laid. When you are happy with the positioning, dump the windward mark (mark 1) overboard.
e. Now you need to set the wing mark (mark 2). THIS IS THE CRITICAL BIT. If the sailing angle is too tight, spinnaker boats won’t be able to put the spinnaker up and if the reach is too broad, the leg will be boring. In most sailing conditions, the course should be set to a 60-60 triangle. The data sheet will give the angle between marks to give this course set up.
NOTE: If the wind strength is above force 4-5, the course should be set up with slightly broader reaches (50º triangle) so that spinnaker boats can sail to the mark.
f. Find the wind direction on the left hand side (column 1) of the 60-60 triangle course sheet. Look horizontally along the line to find the mark angles. Find the ‘Bearing to Wing Mark from Windward mark’ (column 2) and ‘Bearing to the Leeward Mark from the Wing Mark’(column 4).

![]() g.
For or P course, steer the boat on
the compass heading identified in column 2 of course sheet. Keep going until
you can sight a bearing back to the leeward mark that relates to the bearing
identified in column 4 and then lay mark 2.
g.
For or P course, steer the boat on
the compass heading identified in column 2 of course sheet. Keep going until
you can sight a bearing back to the leeward mark that relates to the bearing
identified in column 4 and then lay mark 2.
Example.
Wind Direction 220º (column 1)
Bearing to Wing Mark from Windward Mark = 100º (column 2)
Bearing to Leeward Mark from Wing Mark = 340º (column 4)
h. For P Course you will need to lay mark 4 directly downwind of mark 3. The length of this leg should be about ¼ to ½ the length of the beat.
i. For Trapezium course (see course diagram overleaf), position mark 2 using the reaching angle identified in column 2 of the course sheet – estimate (guess) distance of first leg using geometry from course diagram. When mark 2 has been dropped, proceed directly downwind until you can sight the bearing back to the leeward mark (mark 4) that relates to the ‘Bearing to Leeward Mark from the Wing Mark’ on the course sheet & drop mark 3.
5.
Setting
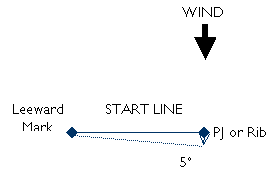
The Start Line At The Leeward/Bottom Mark – Critical
a. Check the wind again as it may have shifted slightly since you started laying the course. When you are happy with the wind direction, use a ‘wind indicator 90º gadget’, arms or the last column on the course sheet + compass to determine relative position of PJ/Rib to the leeward mark.
Note: i. Allow approx 1 - 1½ boat lengths for each boat on the start line
ii. Use Leeward Mark for the port end and anchor PJ or rescue boat at starboard end
iii. Remember to position the boat about 4 or 5 ‘boat lengths’ further forward of the required final resting position before throwing the anchor over the side to allow for the boat to drift back.
 b.
Once you have settled on the anchor, check the wind and angle of the line. You
will be able to put yourself in the correct position by letting more warp out
or by pulling some in. If there is a general recall, check the angle of the
line. If all the boats tried to start at your end (stbd end), consider dropping
back a few boat lengths. Conversely, if they all tried to start at the port
end, consider pulling yourself forward a bit, but be careful as you don’t want
risk breaking the anchor out.
b.
Once you have settled on the anchor, check the wind and angle of the line. You
will be able to put yourself in the correct position by letting more warp out
or by pulling some in. If there is a general recall, check the angle of the
line. If all the boats tried to start at your end (stbd end), consider dropping
back a few boat lengths. Conversely, if they all tried to start at the port
end, consider pulling yourself forward a bit, but be careful as you don’t want
risk breaking the anchor out.
NOTE: The start line is positioned at 90º to the wind or with slight (5º) port bias.
6.
Safety
Check
Liase with the Beach and Rescue boats to establish how many boats have signed on for the race and how many ‘extras’ have left the harbour to sail in the racing area. Ensure all are accounted for and make a list of all boats in the starting area.
7.
Starting
Sequence
|
Mins to Start |
Signal |
Flag |
Up/Down |
Sound signal |
|
|
Postponement |
AP |
Up |
Two blasts |
|
6 |
End Postponement |
AP |
Down |
One |
|
5 |
Warning |
Class Flag |
Up |
One |
|
4 |
Preparatory |
|
Up |
One |
|
1 |
1 Minute |
|
Down |
One |
|
0 |
Start |
Class Flag |
Down |
One |
|
|
Individual
recall |
X |
Up |
One |
|
|
General Recall |
1st Substitute |
Up |
Two |
|
6 |
End Gen Recall |
1st
Substitute |
Down |
One |
Note: Start sequence (5 min Warning signal) should start 1 min after lowering Postponement or Gen Recall Flags
8.
Safety
Check
Periodically during the check the number of boats against the total numbers first recorded to be at sea. If any discrepancies, liaise with the Beach and Rescue Boats to establish where the ‘missing’ boat(s) are.
9.
Setting
The Finishing Line
· Ideally the leading boat should sail for 60 mins and the slowest boat no more than 90 mins. It is recognised that this is difficult to achieve if the Int 14’s are sailing in the same race as the mirrors unless the faster boats are sent on an extra lap (average lap racing using P or trapezium course).
· Note that the finishing line should be at right angles to the direction from the last mark. If the race was to continue, note which way the boats would have gone round the finishing mark. In order to avoid confusion, the committee boat should be moored on the outside of the course so that competitors would naturally sail through the finishing line – see course diagram on Page 1.
|
Signal |
Flag |
Up/Down |
Sound Signal |
|
Shorten Course |
S
|
Up |
Two Blasts |
|
Finish |
|
Up |
None |
Produced By: Allan Tyler & Sarah Maguire, March 2006